

 -Alteryx WDC for Tableau
Sometimes we want our alteryx output to be used as data source in Tableau. Though there are many ways to achieve it like saving the output as execl,txt or .hyper and then using it in tableau. There is a very tool in alteryx called WDC(web data connector). It stores alteryx output as web data and connects to tableau. So when you run your alteryx workflow ,your tableau gets automatically refreshed.
Remember: WDC works only in analytical app not on workflow or macro. You should have API keys to connect to tableau.
So lets start building some app and use WDC.
- Analytical app is nothing but a workflow with some external control on it. When you create an app , you have to pass some control parameters which will help in selecting your input (Interface tool has all such options)
- This parameter will be passed to your workflow and then if found it will run the workflow and produces output.
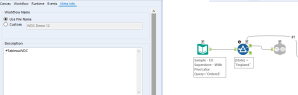
- For sample app, i’m connecting to sample superstore data source

- Then you need to create a workflow based on your requirements. I’m just taking one filter tool to select only region.

- Once you’re creating your workflow ,you need to drag WDC tool from alteryx tool pane and connect at last in workflow.

- Remember WDC should be connected only at last so that it will store your final output in web.
- Now there is a small thing you need to add when using WDC. Go to Configuration window and click on MetaInfo and then in description type #TableauWDC. This is a mandatory step you need to follow ,otherwise your data will not be saved in web
- Now you need to make this workflow as an app. For that, drag any of the interface option except File/Folder browse. These 2 are not used in app.
- In my case i’ve simply used a check box which will checks if all condition met
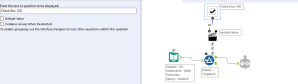
- Now you can see when you drag a check box and connect to your tool, one Action tool gets added automatically. In Action tool you can select your action type.Mostly we use Default update value.
- Once done with all these, your app is ready. Now you can see a magic wand sign before Run option. To test an app, you need to click on wand and check your box and finish


- Finally save your workflow to your gallery.
- Open Tableau and click on Server option,then select WDC
- In WDC you need to add your gallery web url followed by tableau\alteryx-wdc.html. For ex – http://www.alteryx.company.com/tableau/alteryx-wdc.html

- After hitting this, you will be asked to provide API and secret keys. Go to alteryx gallery settings , then go to private studio-> keys. There you can see API and Secret key as hidde, Click on show and you will get secret key as well.
- Enter API and Secret key in tableau and click next
- Then you can see all your app listed . You need to select one and click on check box.
- Thats it, you are now connected to your alteryx data. Use this data source to created your tableau dashboard.
Let me know if it helps or have some doubt.
